Showing posts with label WERQ Bee. Show all posts

Sunday, September 7, 2014

Sunday Stash: Fabric Shop Tour 4

On my summer vacation to Michigan recently the usual visits with family and friends took an unexpected turn, fabric shopping! In this Sunday Stash: Fabric Shop Tour stop I visited Everlasting Stitches. This is another shop that came with high recommendations from my mom. I can see why the shop was so appealing to her, one the staples of this shop is a selection of Civil War reproduction fabrics. My mom loves the darker and muted colors and the small motifs of the patterns. While those are not the fabrics I tend to gravitate towards, I can appreciate their appeal. During this shopping adventure, I couldn't help but think different locations make different colors and different patterns come to life. The reproduction fabrics make sense in Michigan. 


I chose some of the Wee Wander fabrics by Sara Jane for Michael Miller Fabrics. There is Nature Walk Pink, and Woods Petal. Then I picked up some text based fabric with a news paper print and one with numbers that could be a variety of dates and a little dashed red print. Unfortunately I put the three of those to use before recording any of the makers details. 


I also got this Aspen Frost print called Tin Solider from Moda. It was on clearance so I bought the end of the bolt. I thought this one would go well with the Alexander Henry Christmas fabric I picked up earlier on the trip.

Finished Purse String Blocks in red and white.

The red and white fabrics were combined with others from my stash for these Purse String Blocks for the WERQ Bee bee leader. The pattern was easy to follow with Kelly's tutorial on My Quilt Infatuation. My favorite part is how easily it is to re-purpose some of the trimmed pieces into sweet little pinwheels.
Pretty pinwheels from the left over pieces.
 Once again I'm linking up with Molli Sparkles and his Sunday Stash. What colors would you use for a purse string block?

Jan-Micael

Monday, March 31, 2014

Back to School

Well, the week of spring break flew by! Today I was back to school being creative with the kiddos. If you'd ever like to see what kinds of things go on in my artroom, stop on over to Portrait of An Art Room. Anyway, when I got home from this first day back, I had to have a sewing break. 


The modified pineapple block that I posted about earlier had to be revisited. There was much discussion about the blocks on our bee Facebook page. It seems that the cutting directions made some of the steps a little tricky. In the end, the blocks I made were not the right size. So I went back to the drawing board. It was suggested that we cut squares at 3 1/2" (2), 4", 5", 6", 8". Needless to say, the sizes had to be adjusted slightly. Members of the group were having to trim down quite a bit after piecing to get the next square to fit. The final block is about 10 1/2". 
Pictorial Recap!
Pinch to cut!
Cut on pencil lines, press open.
Place next size square on top and sew around.
In addition to the grey modified pineapple block from the previous post, we were to make a block that showed a color gradient. This block would be made of seven fabrics instead of only 6. With that in mind, I followed the same steps for the grey block. We were supposed to cut and then cut an additional square of 9". If you remember though, the grey block ended up being 10 1/2", that would be an awful lot of trimming to get a 9" square to fit. So I cut a 10 1/2" square of the seventh fabric. 

Wait a second! (Here I imagine the sound of a record needle screeching across the vinyl to a stop.) I couldn't do that though. I had only purchased quarter yard cuts of each of my fabrics with a final 9" square needed. I had to do some creative problem solving.  


I ended up cutting two right triangles; one triangle for each half of the square. I knew, that had it been a square of the appropriate size, I would be cutting anyway, so why not just start with two pieces. This worked out well for me.

I am realizing that as an artist, and art teacher that I often am much more forgiving when things need a little finesse to get them to work out. I hope that if you try this technique you are understanding that there may be a little trimming here and there to get all of the squares to match up. Perhaps, as I've just read about, we need to stitch with a scant 1/4" seam. My seams are pretty true to 1/4", so that could cause some, hmm, a good word for here, frustration.

Here is my grey block, on top of the color gradation. I don't want to reveal the final block until our Leader Bee receives them.

This block is the April block for the WERQ Bee. It's the first quilting bee, online or otherwise, that I've ever joined. It's made up of a great group of all male quilters! I was very excited when I stumbled across the parent group. Men Who Quilt on Facebook. It was a group created in tandem with the No Girls Allowed Quilting Bee which I first heard about on Molli Sparkles blog, you can read about it here.  I guess I will have to compose a list of those who are in the WERQ Bee and link to those who have blogs, instagrams, and flickr accounts. That will come soon.

Do you belong to any bees? Do they have photo sharing pages that we should know about?

Here goes anything! Linking up with Stitch by Stitch, Anything Goes Monday.

Wednesday, March 26, 2014

So, yeah. This happened today.

I felt like such a grown-up adult today. I was awake and ready to go by 8:00 this morning and it was my day off! I had a plan to check a few more items off my spring break to-do list and as I'm realizing there isn't enough time in the day to do all of things that I would like to do. 


The first stop was the farmer's market to get strawberries for the second annual spring break jam session. A tradition that started last year when my mom came to visit and one that I want to continue because of memories, love, and deliciousness. 


I thought there was something quietly beautiful about the berry tops in the sink. As I cut the berries this morning, I thought of my grandfather. 

One time while peeling and preparing apples for applesauce, grandpa picked up an apple, looking at it closely and said "Here it is, the one I've been looking for." As a small child, I was astonished, how could he know that apple was the one, and what was so special about it? 
"Why were you looking for that apple?" I asked. "It's the last one" he replied. 

The whole process would have been quite lonely if it hadn't been for my intrepid kitchen helper, Mr.Potato Head. He was in charge of making sure all of the jelly jars were in tip top condition.


The berries are beginning to boil. The first of two batches to be made. 

Mr. Potato Head holds his wand high, admiring the hard work.


After jammin' in the kitchen for a bit. I decided it was time to cut into my coveted quilt expo fabric. It seemed fitting with the strawberry day that I was having to work with stunning strawberry colors in fabric.
I hung them in a tree. Why? Why not?


I followed the method that I was practicing yesterday with some scrap stripes. The scrap stripes are a very even, reliable, predictable stripe. The new fabric has the look of a batik, and perhaps that was the way it was made. I was told that it was hand painted. There are certain irregularities in color from one selvage of the fabric to the other that create really nice variety in the little blocks. 


Barni approves of both projects for the day. He would also like to Live a Colorful Life and randomly join the Let's Bee Social party at Sew Fresh Quilts that I was invited to. I'm not sure that pets are allowed though, so he'll have to sit this one out.


Tuesday, March 25, 2014

Spring Break Projects

Another great day of worry free Spring Break is coming to close. While it may be 'worry free,' I still have a to-do list that feels like a mile long. All of the projects that I have been working on and posting about are fun, but I have listed them as goals to accomplish during this time away from school.

First up is a modified pineapple block for the WERQ Bee. The host for the month of April is Mr. Waldo Bluestone you can view his Instagram here.  He put together some really great directions for us to follow about how to make the blocks. Here is what I created with his directions. I think this block would be a cinch to cut for production piecing. I'll try to paraphrase for you. 

First I cut the fabrics: 2 squares are 3 1/2", and 1 each of 4", 5", 6" and 8". We are cutting ours so that the smallest square is the darkest and the largest square is the lightest with a gradient of colors between the two. *update This method works great, but may not be a precise as I would like. There may be some trimming and finesse needed*
 

On the back of all of the squares except the darkest color mark an 'X' with pencil. I used my ruler to draw the lines from one corner to the other being careful not to stretch the fabric as I drew the line across the grain of the fabric. 

Sew the two 3 1/2" squares, right sides together with a 1/4" seam around the entire square. This was the strangest thing to do. I couldn't imagine what I was going to do with two pieces that were completely stitched together! 


Here it is all sewn together. I found that I could stitch around the edge of the square and when my needle went into the pencil line, I could keep the needle in the down position and then just turn the square to keep the 1/4" seam.

Here is where it gets interesting. You pinch the fabric right on one of the pencil lines and make a small snip with scissors and then cut along the lines. Open and press the seams and you have a square within a square! I was so excited that this worked, and that it was so easy. 


I trimmed off the little triangle bits that hang off on each side and was ready to sew the next largest square on in the same manner. The picture on the right above shows the original square all trimmed and placing the next square on top. Just repeat these steps until all the squares have been used up. If you're like me, you'll be sad when you've gone through all of the squares. I really wanted to just keep adding to this block. As Mr. Bluestone mentioned there is one square that you cut the 'X' and press it and find that it is just a bit too big for the next solid square, I just trimmed that one down a little bit and was ready to go. This made a great 10" block.

I'm thinking this block would be easy to save scraps for, just save squares in all of the sizes that you'll need and stitch them together when ever you have a nice cache of them.

Another item that I've been working on is trying to decide what to do with this fantastic fabric I bought at the Quilt Expo in Lakeland. I originally thought I could use it in the graphic block that I made before, but I think there are just too many colors for this to be successful. 


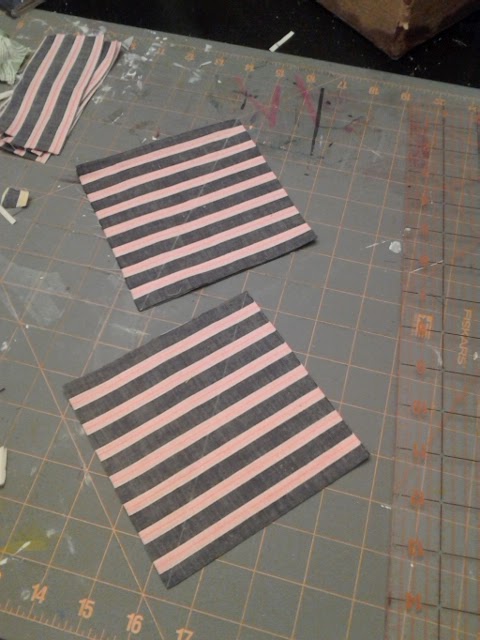
I did some experimenting tonight to see how the stripes could be put together. I used scraps of other stripes because I'm afraid to cut into my other prized fabric. 


I made up some HST's (Half Square Triangles). I cut 5" squares and put two of them together. Then I drew a line down the middle with some tailors chalk. I sewed a 1/4" inch away from the line on both sides and cut on the line afterwards. Press the seams open and there are perfect mitered stripes. I think those bright colors will make a great variety of these blocks and I can play with an arrangement later. 


Now to just round out my evening and hop around the blog world a bit. Fortunately I found the Fabric Tuesday linky party at Quilt Story. That's where I'm going to start tonight! I will end at My Quilt Infatuation's Needle and Thread Thursday