


Another great day of worry free Spring Break is coming to close. While it may be 'worry free,' I still have a to-do list that feels like a mile long. All of the projects that I have been working on and posting about are fun, but I have listed them as goals to accomplish during this time away from school.

First up is a modified pineapple block for the WERQ Bee. The host for the month of April is Mr. Waldo Bluestone you can view his Instagram here. He put together some really great directions for us to follow about how to make the blocks. Here is what I created with his directions. I think this block would be a cinch to cut for production piecing. I'll try to paraphrase for you.
First I cut the fabrics: 2 squares are 3 1/2", and 1 each of 4", 5", 6" and 8". We are cutting ours so that the smallest square is the darkest and the largest square is the lightest with a gradient of colors between the two. *update This method works great, but may not be a precise as I would like. There may be some trimming and finesse needed*

On the back of all of the squares except the darkest color mark an 'X' with pencil. I used my ruler to draw the lines from one corner to the other being careful not to stretch the fabric as I drew the line across the grain of the fabric.

Sew the two 3 1/2" squares, right sides together with a 1/4" seam around the entire square. This was the strangest thing to do. I couldn't imagine what I was going to do with two pieces that were completely stitched together!


Here it is all sewn together. I found that I could stitch around the edge of the square and when my needle went into the pencil line, I could keep the needle in the down position and then just turn the square to keep the 1/4" seam.

Here is where it gets interesting. You pinch the fabric right on one of the pencil lines and make a small snip with scissors and then cut along the lines. Open and press the seams and you have a square within a square! I was so excited that this worked, and that it was so easy.


I trimmed off the little triangle bits that hang off on each side and was ready to sew the next largest square on in the same manner. The picture on the right above shows the original square all trimmed and placing the next square on top. Just repeat these steps until all the squares have been used up. If you're like me, you'll be sad when you've gone through all of the squares. I really wanted to just keep adding to this block. As Mr. Bluestone mentioned there is one square that you cut the 'X' and press it and find that it is just a bit too big for the next solid square, I just trimmed that one down a little bit and was ready to go. This made a great 10" block.
I'm thinking this block would be easy to save scraps for, just save squares in all of the sizes that you'll need and stitch them together when ever you have a nice cache of them.
Another item that I've been working on is trying to decide what to do with this fantastic fabric I bought at the Quilt Expo in Lakeland. I originally thought I could use it in the graphic block that I made before, but I think there are just too many colors for this to be successful.

I did some experimenting tonight to see how the stripes could be put together. I used scraps of other stripes because I'm afraid to cut into my other prized fabric.
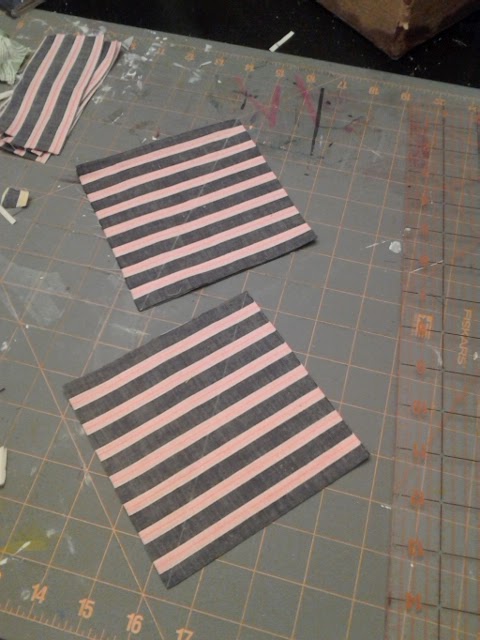
I made up some HST's (Half Square Triangles). I cut 5" squares and put two of them together. Then I drew a line down the middle with some tailors chalk. I sewed a 1/4" inch away from the line on both sides and cut on the line afterwards. Press the seams open and there are perfect mitered stripes. I think those bright colors will make a great variety of these blocks and I can play with an arrangement later.

Now to just round out my evening and hop around the blog world a bit. Fortunately I found the Fabric Tuesday linky party at Quilt Story. That's where I'm going to start tonight! I will end at My Quilt Infatuation's Needle and Thread Thursday.
That fabric (which is fabulous BTW) would look AMAZING with those blocks!
ReplyDeleteWhat a wonderful visual from a simple block, looking forward to seeing it finished!
ReplyDeleteI have seen that method for making hst's by cutting across the diagonals of both layers. But using it to make square in a square blocks is brilliant! And looks like sew much fun! Love the stripes, too! Would you care to join us over at the Let's Bee Social linky party, Mr. Briggs? Love to have you join in! http://sewfreshquilts.blogspot.ca/2014/03/lets-bee-social-13.html
ReplyDeleteOkay, now I'm excited to have something new to share with my quilt guild... Thanks for the square-in-a-square directions - sew simple, yet completely mind blowing! :D Very nice to meet you, Mr. Briggs. P.S. Your "expo" stripes look delicious.
ReplyDeletevery cool, love those HST!!!!
ReplyDeleteHello Mr. Briggs,
ReplyDeleteThat is a really nifty way to construct a block. I shall have to have a go. The coloured stripes are fantastic, and I can understand why you don't want to cut into them.
Love from England,
Muv
that is such a cool method for square in square construction. genius! I'm a teacher as well (3rd grade), and I know- Spring Break is never quite long enough!
ReplyDeleteThanks so much for showing this off at Needle and Thread Thursday!
:) Kelly @ My Quilt Infatuation
Thanks for the square in a square directions; you make it seem so easy. I love your mitred stripes too; a brilliant idea.
ReplyDeleteBrilliant! And I love the stripe fabrics!!
ReplyDeleteThis block is everywhere. I just saw a tutorial on this same technique: They were calling their version, "The Exploding Block." I love the colors you used here. Thank you for the inspiration.
ReplyDelete