Sunday, June 29, 2014

Rings N' Things Block

Woot! I get to play host to the WERQ Bee this month! I've been struggling to come up with a plan for the block I would like, but here goes. A curved seam quilt has been a dream of mine for quite some time. The inspiration and templates for this block came from the book Link to the '30's: Making the Quilts We Didn't Inherit by Kay Connors and Karen Earlywine which I mentioned before on my quilty bucket list.  
A finished, albeit wrinkly Rings 'n Things block.

In an attempt to modernize this block, called Rings 'n Things, I am requesting the block be made in values of grey, and various citrus colors. I like the thought of pink grapefruit in the mix, but also like brighter oranges and yellows. 
citrus crush
Color inspiration from Design Seeds.
Now to assemble the materials. You'll need:
  • a copy of the templates (The pattern can be found on the publisher's website, Martingale).
  • a quarter cut of grey fabric for each block (I found I only used about half of this.)
  • a quarter cut of citrus color fabric for each block (again, I used slightly less.) 
  • a means to transfer the template (I used freezer paper.)
  • all the other sewing goodies, scissors, sewing machine, pins, iron, etc.

Getting the supplies ready to make the template.
There are probably countless other (and easier) ways to cut out these pattern pieces, so of course you can use what you know, or follow along with me for a way I thought worked really well. I created templates on freezer paper. These templates took a little time and planning, but made it easy to cut the curves and minimized stretching the fabric. This block calls for 4 of each of the template pieces A,B, and C. Each of the pattern/template pieces has an arrow to indicate the fabric grain line, so I started my templates by drawing guidelines on the non shiny side of my freezer paper using my rotary cut ruler and a pencil. (The shiny side of the paper is the one that sticks to the fabric when you iron it down.) These lines were parallel to each other and mimicked the grain line of the fabric. 
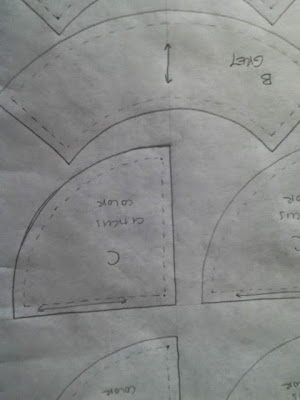
In this horrible, upside down picture, you can see the very light horizontal and vertical guidelines that mimic the grain of the fabric.
Next, place the printed template under the freezer paper lining up the directional arrows with the guidelines. Trace with pencil. I only traced the outside cutting line, the directional arrows, and dashed 1/4" seam line. Move the template and trace again. I liked how I could plan out where pieces would go.    
Notice on the arc pieces how the directional arrows are all lined up. 
Each template blob fits nicely on a 1/4 yard cut, except the arcs of piece 'B.' I moved one of those arcs to it's own place on the fabric making sure the directional arrow followed a grain line of the fabric.
I cut these templates out in big blobs with all of the same pieces together. I planned each of the blobs so they would fit onto a quarter yard cut of fabric. Next, iron the entire template blob to the fabric, I ironed mine to the wrong side of the fabric, but I suppose it doesn't matter. Also when I ironed the freezer paper on, I used the cotton setting and placed the iron directly onto the paper. The shiny side of the freezer paper is facing the fabric. Then I turned the whole thing over and ironed the back of the fabric too! 

*Disclaimer time* I'm not really sure if I'm using the best techniques, or the "right way." I'm just sharing my personal experience with this quilt block along with some thoughts and ideas, and maybe ruining good scissors in the process. Please use your best judgement, and the vast knowledge of the Google if you think any of my directions are sounding like a crazy person! Also you can leave a comment or question and I and/or other readers will respond. *End Disclaimer*

So I ironed all of those big template blobs to my fabric and went to town cutting them all out. It wasn't until I was all done and realized I was using the "scissors I vowed to only use to cut fabric" to cut through not only fabric but also FREEZER PAPER! I'm not sure if this is a bad thing, or a good thing, if I ruined my scissors, but perhaps something to take in to consideration when choosing your weapon cutting tool. I really liked having all of the extra paper on the template because I felt that it added stability when I was cutting. 


I did try another method (shown in the picture above to the right), I cut all of the freezer paper template pieces and ironed them to the fabric separately. This also worked well, but there was not as much stability as the paper template blob, and I noticed that I was leaving a teeny bit of fabric hanging out from the edges of the template. Does this really change the block? I'm not sure, but I figure that if I were to make an entire quilt this way, I would be consistent in my cutting and only choose one method so that all of the pieces are the same size. By the way, don't those pieces look pretty all cut out!? In addition to the curved pieces from the template, there is a square that is 5 1/2" x 5 1/2" that goes right in the center of this arrangement.
The pieces cut and laid out.

Getting down to business!
Lets sew these bits together!
These are the first three pieces to put together.
Start with the square and two of the template 'A' pieces. Sew these pieces to opposite sides of the square, aligning the edges and placing fabrics right sides together. Press so that the seams are towards the 'A' pieces.

Here the left and right sides are sewed and pressed, and now it's time to add the top and the bottom.
Sew the last two 'A' pieces to the top and the bottom in the same manner as the the others.

Now it's taking shape. I love how the square floats in the middle.
It's time to add some arcs!
Now to sew one arc piece 'B' into each of the curves. After I made my blocks and took all the pictures for this post I decided to look at videos about curved piecing and found a great tutorial at Fons and Porter on YouTube. This tutorial is so great, it may just make the rest of my post unnecessary. I will continue on though, if you would like to follow along. I used the methods described in Link to the '30's for curved piecing and will show you what I did, but I think the video makes it so much easier!


First find the center of each curve. Fold the arc piece in half and finger press to find the center. The pieced curve already has a center as indicated by the point of the square. Lay these two pieces right sides together. Here the video says, "We always want to sew with a smile, so the smile curve is placed on top." I thought was clever and helpful. 


Here I'm aligning the point of the square with the finger pressed center of the arc. Next pin these together. The video suggests using a 'small bite' with the pin for this center pinning. Mine was perhaps a little too big and as I discovered while sewing is that this big bite does not allow the fabric to move as much as necessary for the curve to be successful.


Next, I pinned the far ends of the arc 'B' with the curves of the pieced center. Here it is OK to take a bigger 'bite' with the pin because the ends should stay where they are. The book I am following suggests using more pins, which I did, and I think was helpful, but as the video points out 'small bites' with the pins allow the fabric to move more, which I will ensure I do on my next attempt. Sew the pieces with a 1/4" seam allowance. Work slowly to ensure the edges of the fabric stay aligned and that the curved pieces do not fold or pucker into themselves. Do you see that big crease in the grey fabric of the photo below? The crease that is just above the point of the snippy scissors? Yeah that is a crease that was made because I wasn't careful and the fabric got bunched up and I sewed a seam right through the bunched up fabric mess! It happens! Thankfully a little seam ripper action helped me out and I was back in business. 


The book also suggests making small clips to the seam allowance of the curve. I did, but as good ol' Fons and Porter point out, the curved seam will lay a certain way all on it's own. So you can just press the seams in this natural direction without clipping. Follow the curved piecing techniques to add the remaining 'B' arcs.
Look, the square is still floating, and the corners do not touch the arcs! I love it!
The same curved piecing techniques are used to place the smaller corner pieces.


According to the book the finished block should be 12 1/2" square, so that it is 12" square in the quilt. My test blocks have all been about this size. So if you are a WERQr, I'd like if you would not trim the blocks, that way there is more room to play when I construct the quilt top.

Well I hope this thoroughly describes how to construct the July WERQ Bee block. If you have any questions please feel free to comment below. If you are a WERQr Bee, please use the FB forum for questions and we can help each other. That's what we're there for. :)

Linking up with Caroline at SewCanShe and Show Off Saturday! I think I will be trying her duct tape basting trick! 

Tuesday, May 13, 2014

Finding Time

Spring break spoiled me! I had tons of time to really get down and dirty with my sewing machine and bring some of the quilty ideas from my head into fruition. Wait, I must not lie. Things didn't come to full fruition, but I did create some more WIP's (Work In Progress.) Foremost is this wild ride of stripey goodness. Since my last update, I have made some progress.


I created four squares for the center of this quilt, each a nine patch of mitered stripes and a half border of those triangle things that I have seen on the traditional bear paw block. I have been designing this as I go, and without a proper design wall I have laid ideas out on the floor and snapped poorly framed pictures from above in an effort to help me decide. 


My original idea calls for sashing between these blocks which will provide more separation and allow each of the four blocks a presence of their own. 


I knew that I would like these original four blocks to be the center of something larger. I found an image in little book that I received from my secret Santa my first year of teaching about Amish Quilts which gave me the idea of a diamond within a square and continuing with the those bear paw or saw tooth points. The drawing tucked under the half square triangles above was the next incarnation of the design. I used the purple highlighter to indicate which parts I had completed.


The design continues to take shape with a mix of mitered stripes and my low volume background fabrics fashioned into a shape for which I have no name... These two pictures were taken while I was perched atop an 8 foot ladder so I could get the whole layout in the shot. Grr, the lack of design wall is killing me! I like the layout above and the movement the shapes have. Ok, so here is a little tip, that perhaps you already know, but a really great way to see color value, or the differences between the lights and darks of an image is to squint your eyes. Give it a try, when you squint and look at the photo above you may see a pinwheel shape in the red fabrics. Below you may be apt to focus on the vertical column of red that runs through the center of the quilt. 

What tips to help you through the design of a project? I'd love to hear your ideas and really any advice you might have about a design wall! I really need to stop this insanity and save myself from toppling from the ladder. 

I'm linking up with the lovely Lorna McMahon at Sew Fresh Quilts for Let's Be Social. It's a great way to meet some new friends, see what your old friends are up to and soak up tons of great inspiration! 

Wednesday, April 9, 2014

A Quilty Coaster Ride

Tonight I was sewing to help melt the worries of work away. Sometimes a little sew time is all I need to lift my mood and sometimes that sew time is surprisingly  productive. I've been working with this great stripe fabric that has had me on a quilting roller coaster ride. 

I hung the fabric from a tree while I doused it with starch. It's a new technique that I think I will be adopting for future endeavors. I love how stiff and almost paper like the fabric has become. 


I was headed to the peak of the lift hill as I purchased the yardage, dreaming about how I might use it. I zoomed down the first hill to a low when I realized the fabric has too many variations to experiment with this graphic quilt design I've been playing with. I banked to the left and through a loop when I came up with a new idea, then the coaster plunged lower as I realized I was not using my fabric wisely. 

My new idea, which may become the center for a medallion style quilt. I'm still not sure.

I was following the method of making half square triangles (HST) whereby you take two squares of fabric, placing them right sides together and draw a line diagonally from one corner to another, stitching 1/4" on each side of the line and then cutting them apart. It wasn't until I had 48 of these that I realized how important it was to take note of the direction of the diagonal line when using a striped directional fabric as one the squares. As you will see in the final picture of this post I need some of these HST that have stripes that go in one direction, and other HST that have stripes in the other direction.
  

Fortunately, (if I may continue my roller coaster metaphor) I think I've reached a second lift hill in this ride and am ready for the twists and turns that will follow. I have one portion of my design complete!


I think this progress calls for a little party. I'm linking up with the WIP Wednesday Party at Freshly Pieced Modern Quilts. I really hope I make a win from Canton Village Quilt Works, the sponsor of the party. 

Tuesday, April 8, 2014

Motivation!

I have heard that if you put goals in writing you are more likely to reach them. Your chances of meeting those written goals increase more if you share them with others. I am ready for that motivation. Luckily, I happened upon the lovely Katy Cameron at the The Littlest Thistle. She has organized this fantastic Finish Along. It's a little party where the festivities begin by sharing your goals, chat with some other quilty friends, play a little music, comment on the progress being made, have a glass of wine, stitch and play on your own projects and at the end share in the joy of all the successful and complete projects you have! It's the first time I've joined, but it sounds like a great time. You will have to provide your own music and wine but the hostess has rounded up some great prizes and parting gifts.

What would I like to finish before July 6th?

1. 30's Reproduction Quilt


This quilt has been boxed up for about 7 years. Currently it's getting a breath of fresh air, then it needs batting, backing, quilting and binding. A twin size is a nice size for a lap quilt in my 6'4" opinion.

2. Summer Sampler/Solstice Star Quilt

The finished top of last summer's project. A project using the Summer Sampler Series and Solstice Star Series at Fresh Lemon Quilts.

The pieced backing for last summer's project. 
 I started this quilt last summer as I dipped my toes back into the quilting water. The summer was the perfect time to make the top and the back. I decided to try my a little hand quilting on this, and sadly can't remember when that part of the project started. I worked on it almost non stop over winter break from school, but it still needs to have the quilting finished, trimmed and binding added.

3. Geometric Strip Wall Hanging


This was a little experiment in striped fabrics. I am really happy with how it has turned out, but I still have to figure out what to do to finish it. I know that it will need batting, backing, quilting and binding. I have yet to decide if there will be borders involved. I also need to do some better photography and make sure there aren't crazy cords in the shot!

4. Strip Medallion (?) Lap Quilt

These are some striped half square triangle (HST) that I have started for this project. 
This is a rough drawing for the central portion of this quilt. I'm not sure what it will become.
I was inspired by this fabric when I saw it at Quilting and Sewing Expo that I attended a couple of weeks ago. I had to have some and have started with an idea. I'm not really sure where it is going, but know that this project will be a lap style quilt that will be a gift for someone who is shorter in stature than myself and may not require a twin size quilt. I will have to finish the design, finish piecing the top, figure out the backing situation, batting, quilting and binding. I'm not going to lie, this will probably be a project that will roll over to the next quarter, but I can dream! 

5. Under-Ruse Wall Hanging
My original design for Under-Ruse.
My partner, Shark, has requested a wall hanging of this design. It will be made of scrap fabric or something that he decides upon. Honestly, this is stretching my creative imagination to even add this project to the list. If I could play hooky from school all the time, I know I could make something of this too during this quarter. I'm going to give it a go! I will need to piece the top, bat, back, quilt and bind!

Eek! As I scroll back through this ambitious list, I can't help but wonder what I'm getting myself into. If you care to join me, stop by The Littlest Thistle before April 14th to find out all of the details.

I hope to see everything you would like to finish as well!


Wednesday, April 2, 2014

Blog Love

I remember one of my painting instructors in college asked if I 'blogged.' At the time, I didn't. The word seemed foreign, the concept was strange. I couldn't buy into it and I couldn't see how my teacher (of my parents generation) would be into this online community! I guess that is what I failed to understand from the get go: Community. My understanding was that it was a journal of sorts, a place for you to record your thoughts and experiences, not unlike a diary. I have since learned that the blog is much more about community. 
A block I designed for a contest that I heard about in the blog world.

I am able to record those thoughts and experiences, but they are along a much more specific topic than I first imagined. I am also able to partake in the postings of so many others who share similar interests with me. I am learning that there is discussion in the comments, there are familiar names and faces, and there are friends who challenge you and help you grow. Each picture in this post is something that would not have been created if it had not been for blogs!
A block made by Carole Gold at Fresh Off the Frame using a technique that I wrote about on my blog.

In the spirit of learning, growing and community, I excited to join the Small Blog Meet at Lily's Quilts. I know that here I will find more inspiration, stories, challenges and conversation.    

My design wall featuring WERQ Bee sample blocks.
What have you created that would not be if it had not been inspired by your bloggy adventures?


Monday, March 31, 2014

Back to School

Well, the week of spring break flew by! Today I was back to school being creative with the kiddos. If you'd ever like to see what kinds of things go on in my artroom, stop on over to Portrait of An Art Room. Anyway, when I got home from this first day back, I had to have a sewing break. 


The modified pineapple block that I posted about earlier had to be revisited. There was much discussion about the blocks on our bee Facebook page. It seems that the cutting directions made some of the steps a little tricky. In the end, the blocks I made were not the right size. So I went back to the drawing board. It was suggested that we cut squares at 3 1/2" (2), 4", 5", 6", 8". Needless to say, the sizes had to be adjusted slightly. Members of the group were having to trim down quite a bit after piecing to get the next square to fit. The final block is about 10 1/2". 
Pictorial Recap!
Pinch to cut!
Cut on pencil lines, press open.
Place next size square on top and sew around.
In addition to the grey modified pineapple block from the previous post, we were to make a block that showed a color gradient. This block would be made of seven fabrics instead of only 6. With that in mind, I followed the same steps for the grey block. We were supposed to cut and then cut an additional square of 9". If you remember though, the grey block ended up being 10 1/2", that would be an awful lot of trimming to get a 9" square to fit. So I cut a 10 1/2" square of the seventh fabric. 

Wait a second! (Here I imagine the sound of a record needle screeching across the vinyl to a stop.) I couldn't do that though. I had only purchased quarter yard cuts of each of my fabrics with a final 9" square needed. I had to do some creative problem solving.  


I ended up cutting two right triangles; one triangle for each half of the square. I knew, that had it been a square of the appropriate size, I would be cutting anyway, so why not just start with two pieces. This worked out well for me.

I am realizing that as an artist, and art teacher that I often am much more forgiving when things need a little finesse to get them to work out. I hope that if you try this technique you are understanding that there may be a little trimming here and there to get all of the squares to match up. Perhaps, as I've just read about, we need to stitch with a scant 1/4" seam. My seams are pretty true to 1/4", so that could cause some, hmm, a good word for here, frustration.

Here is my grey block, on top of the color gradation. I don't want to reveal the final block until our Leader Bee receives them.

This block is the April block for the WERQ Bee. It's the first quilting bee, online or otherwise, that I've ever joined. It's made up of a great group of all male quilters! I was very excited when I stumbled across the parent group. Men Who Quilt on Facebook. It was a group created in tandem with the No Girls Allowed Quilting Bee which I first heard about on Molli Sparkles blog, you can read about it here.  I guess I will have to compose a list of those who are in the WERQ Bee and link to those who have blogs, instagrams, and flickr accounts. That will come soon.

Do you belong to any bees? Do they have photo sharing pages that we should know about?

Here goes anything! Linking up with Stitch by Stitch, Anything Goes Monday.

Wednesday, March 26, 2014

So, yeah. This happened today.

I felt like such a grown-up adult today. I was awake and ready to go by 8:00 this morning and it was my day off! I had a plan to check a few more items off my spring break to-do list and as I'm realizing there isn't enough time in the day to do all of things that I would like to do. 


The first stop was the farmer's market to get strawberries for the second annual spring break jam session. A tradition that started last year when my mom came to visit and one that I want to continue because of memories, love, and deliciousness. 


I thought there was something quietly beautiful about the berry tops in the sink. As I cut the berries this morning, I thought of my grandfather. 

One time while peeling and preparing apples for applesauce, grandpa picked up an apple, looking at it closely and said "Here it is, the one I've been looking for." As a small child, I was astonished, how could he know that apple was the one, and what was so special about it? 
"Why were you looking for that apple?" I asked. "It's the last one" he replied. 

The whole process would have been quite lonely if it hadn't been for my intrepid kitchen helper, Mr.Potato Head. He was in charge of making sure all of the jelly jars were in tip top condition.


The berries are beginning to boil. The first of two batches to be made. 

Mr. Potato Head holds his wand high, admiring the hard work.


After jammin' in the kitchen for a bit. I decided it was time to cut into my coveted quilt expo fabric. It seemed fitting with the strawberry day that I was having to work with stunning strawberry colors in fabric.
I hung them in a tree. Why? Why not?


I followed the method that I was practicing yesterday with some scrap stripes. The scrap stripes are a very even, reliable, predictable stripe. The new fabric has the look of a batik, and perhaps that was the way it was made. I was told that it was hand painted. There are certain irregularities in color from one selvage of the fabric to the other that create really nice variety in the little blocks. 


Barni approves of both projects for the day. He would also like to Live a Colorful Life and randomly join the Let's Bee Social party at Sew Fresh Quilts that I was invited to. I'm not sure that pets are allowed though, so he'll have to sit this one out.